runC 与容器运行时
RunC 是用来运行容器的一个轻量级工具。被称为运行容器的运行时,它负责利用符合标准的文件 OCI(Open Container Initiative)标准等资源运行容器
OCI 规范
OCI(Open Container Initiative)规范是事实上的容器标准,已经被大部分容器实现以及容器编排系统所采用,包括 Docker 和 Kubernetes。它的出现是一段关于开源商业化的有趣历史:它由 Dokcer 公司作为领头者在 2015 年推出,但如今 Docker 公司在容器行业中已经成了打工仔。
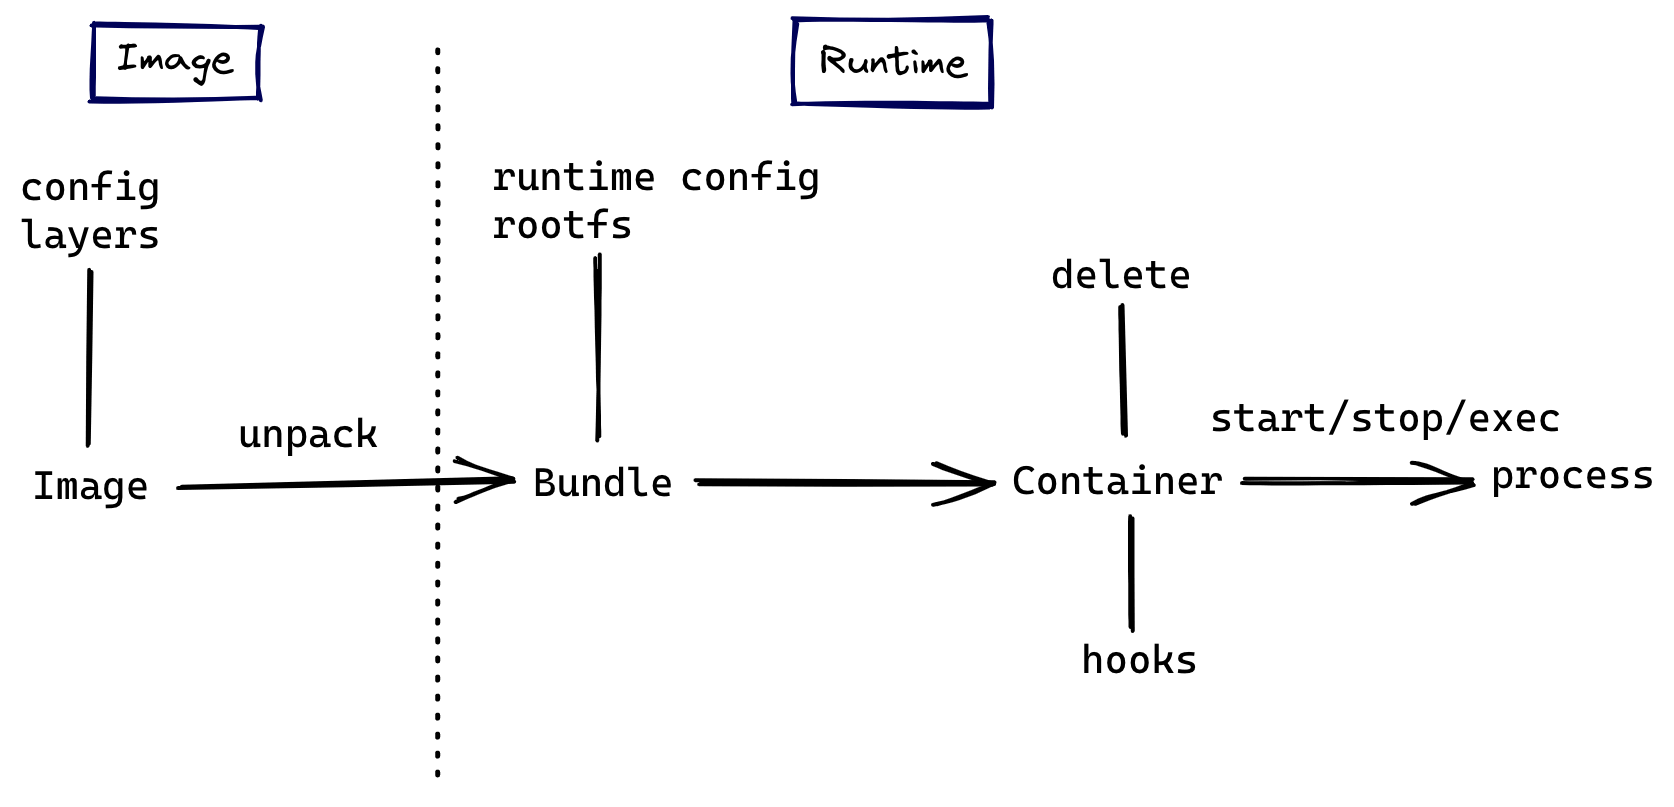
从 OCI 规范开始了解容器镜像,可以让我们对容器技术建立更全面清晰的认知,而不是囿于实现细节。OCI 目前提出的规范有如下这些,它们分别覆盖了容器生命周期的不同阶段
- Runtime Specification:运行时规范指定容器的配置、执行环境和生命周期
- Image Format:镜像规范定义了如何创建一个符合规范的镜像, 规定了镜像需要输出的内容和格式
- Distribution Specification:分发规范定义了一个 API 协议来促进和标准化内容的分发

譬如当我们执行 docker run alpine sh 的时候:
- 到了 shim 环节后,shim 启动 runc
- runC 负责找到 alpine 这个镜像文件中的 sh 程序并运行
- 交给它的父进程 shim 接管 sh 这个进程
Docker
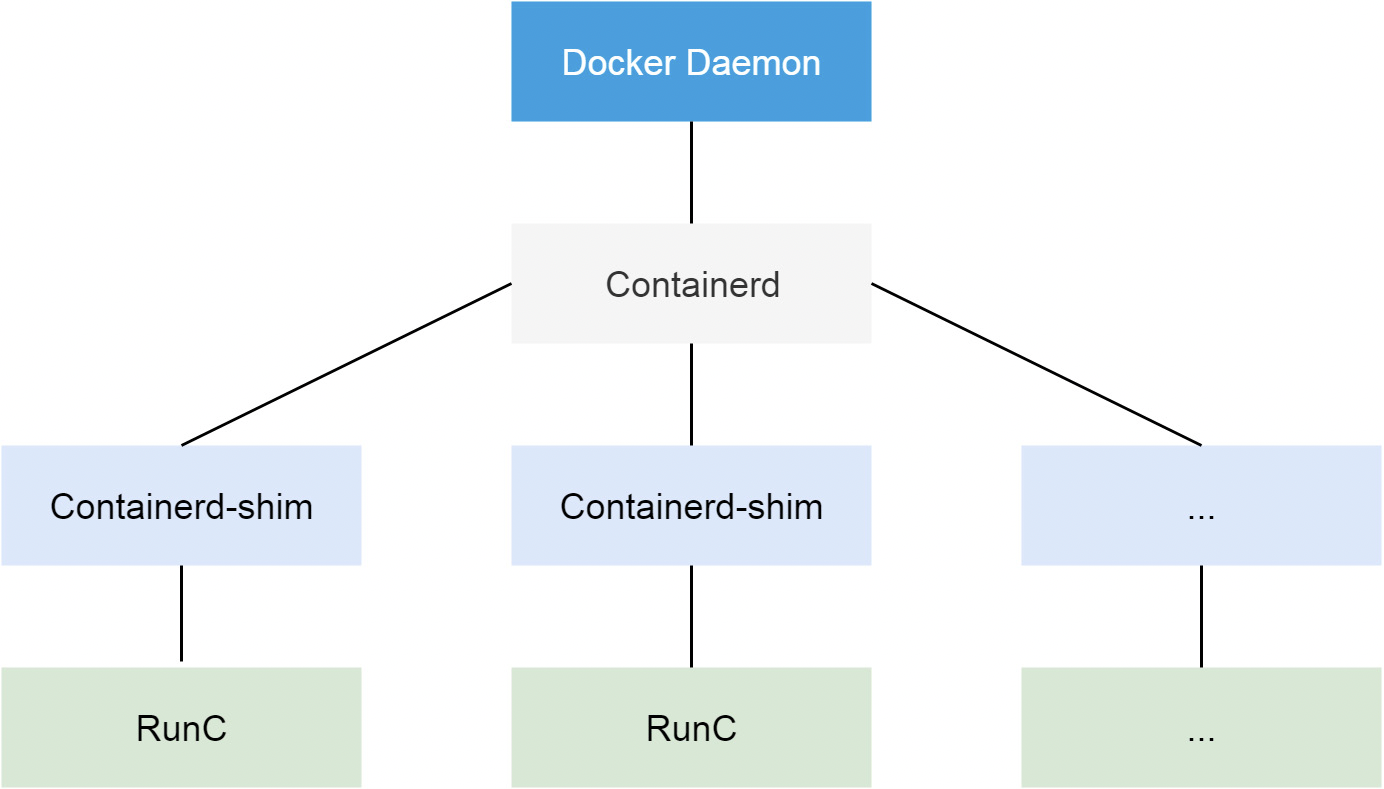
从 Docker 1.11 版本开始,Docker 容器运行就不是简单通过 Docker Daemon 来启动了,而是通过集成 containerd、runc 等多个组件来完成的。虽然 Docker Daemon 守护进程模块在不停的重构,但是基本功能和定位没有太大的变化,一直都是 CS 架构,守护进程负责和 Docker Client 端交互,并管理 Docker 镜像和容器。现在的架构中组件 containerd 就会负责集群节点上容器的生命周期管理,并向上为 Docker Daemon 提供 gRPC 接口

当我们要创建一个容器的时候,现在 Docker Daemon 并不能直接帮我们创建了,而是请求 containerd 来创建一个容器,containerd 收到请求后,也并不会直接去操作容器,而是创建一个叫做 containerd-shim 的进程,让这个进程去操作容器,我们指定容器进程是需要一个父进程来做状态收集、维持 stdin 等 fd 打开等工作的,假如这个父进程就是 containerd,那如果 containerd 挂掉的话,整个宿主机上所有的容器都得退出了,而引入 containerd-shim 这个垫片就可以来规避这个问题了
然后创建容器需要做一些 namespaces 和 cgroups 的配置,以及挂载 root 文件系统等操作,这些操作其实已经有了标准的规范,那就是 OCI(开放容器标准),runc 就是它的一个参考实现(Docker 被逼无耐将 libcontainer 捐献出来改名为 runc 的),这个标准其实就是一个文档,主要规定了容器镜像的结构、以及容器需要接收哪些操作指令,比如 create、start、stop、delete 等这些命令。runc 就可以按照这个 OCI 文档来创建一个符合规范的容器,既然是标准肯定就有其他 OCI 实现,比如 Kata、gVisor 这些容器运行时都是符合 OCI 标准的
所以真正启动容器是通过 containerd-shim 去调用 runc 来启动容器的,runc 启动完容器后本身会直接退出,containerd-shim 则会成为容器进程的父进程,负责收集容器进程的状态,上报给 containerd,并在容器中 pid 为 1 的进程退出后接管容器中的子进程进行清理,确保不会出现僵尸进程
而 Docker 将容器操作都迁移到 containerd 中去是因为当前做 Swarm,想要进军 PaaS 市场,做了这个架构切分,让 Docker Daemon 专门去负责上层的封装编排,当然后面的结果我们知道 Swarm 在 Kubernetes 面前是惨败,然后 Docker 公司就把 containerd 项目捐献给了 CNCF 基金会,这个也是现在的 Docker 架构
CRI
我们知道 Kubernetes 提供了一个 CRI 的容器运行时接口,那么这个 CRI 到底是什么呢?这个其实也和 Docker 的发展密切相关的
在 Kubernetes 早期的时候,当时 Docker 实在是太火了,Kubernetes 当然会先选择支持 Docker,而且是通过硬编码的方式直接调用 Docker API,后面随着 Docker 的不断发展以及 Google 的主导,出现了更多容器运行时,Kubernetes 为了支持更多更精简的容器运行时,Google 就和红帽主导推出了 CRI 标准,用于将 Kubernetes 平台和特定的容器运行时(当然主要是为了干掉 Docker)解耦
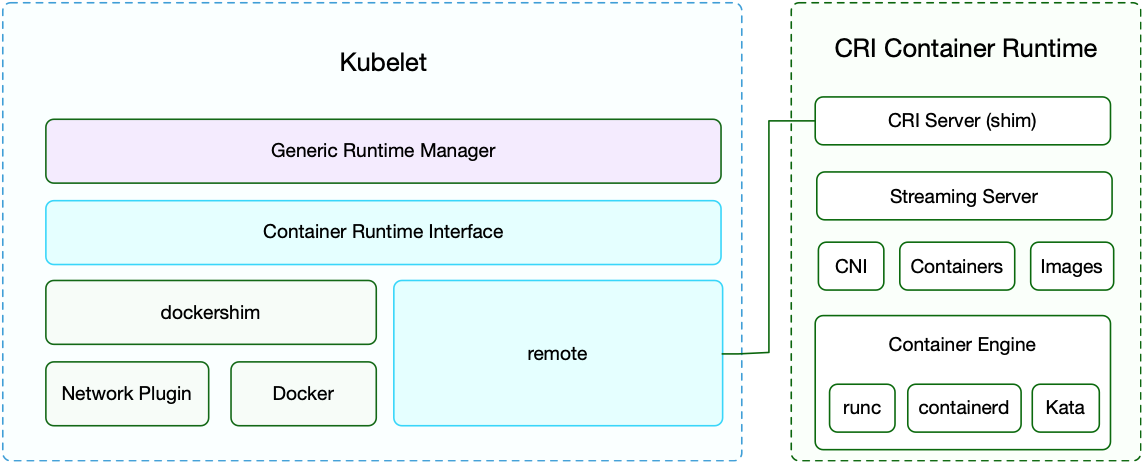
CRI(Container Runtime Interface 容器运行时接口)本质上就是 Kubernetes 定义的一组与容器运行时进行交互的接口,所以只要实现了这套接口的容器运行时都可以对接到 Kubernetes 平台上来。不过 Kubernetes 推出 CRI 这套标准的时候还没有现在的统治地位,所以有一些容器运行时可能不会自身就去实现 CRI 接口,于是就有了 shim(垫片), 一个 shim 的职责就是作为适配器将各种容器运行时本身的接口适配到 Kubernetes 的 CRI 接口上,其中 dockershim 就是 Kubernetes 对接 Docker 到 CRI 接口上的一个垫片实现

Kubelet 通过 gRPC 框架与容器运行时或 shim 进行通信,其中 kubelet 作为客户端,CRI shim(也可能是容器运行时本身)作为服务器
CRI 定义的 API 主要包括两个 gRPC 服务,ImageService 和 RuntimeService,ImageService 服务主要是拉取镜像、查看和删除镜像等操作,RuntimeService 则是用来管理 Pod 和容器的生命周期,以及与容器交互的调用(exec/attach/port-forward)等操作,可以通过 kubelet 中的标志 --container-runtime-endpoint 和 --image-service-endpoint 来配置这两个服务的套接字

现在如果我们使用的是 Docker 的话,当我们在 Kubernetes 中创建一个 Pod 的时候,首先就是 kubelet 通过 CRI 接口调用 dockershim,请求创建一个容器,kubelet 可以视作一个简单的 CRI Client, 而 dockershim 就是接收请求的 Server,不过他们都是在 kubelet 内置的
dockershim 收到请求后, 转化成 Docker Daemon 能识别的请求, 发到 Docker Daemon 上请求创建一个容器,请求到了 Docker Daemon 后续就是 Docker 创建容器的流程了,去调用 containerd,然后创建 containerd-shim 进程,通过该进程去调用 runc 去真正创建容器

实验
RunC 是运行容器的运行时,是 OCI Runtime 的参考实现。它负责利用符合标准的文件等资源运行容器,但是它不包含 docker 那样的镜像管理功能。所以要用 runC 运行容器,我们先得准备好容器的文件系统。所谓的 OCI bundle 就是指容器的文件系统和一个 config.json 文件。有了容器的文件系统后我们可以通过 runc spec 命令来生成 config.json 文件。使用 docker 可轻松的生成容器的文件系统,因为 runC 本来就是 docker 贡献给社区的嘛!
# 准备 OCI bundle
docker pull alpine:3.12
mkdir -p alpine/rootfs
docker export $(docker create alpine:3.12) | tar -C alpine/rootfs -xvf -

# 生成容器配置文件
runc spec
运行容器
修改 config.json 配置,以 detach 模式运行容器
{
	"ociVersion": "1.0.2-dev",
	"process": {
		"terminal": false,	// 非交互式
		"user": {
			"uid": 0,
			"gid": 0
		},
		"args": [	// 启动参数
			"/app/myhttp"
		],
		"env": [	// 容器env
			"PATH=/usr/local/sbin:/usr/local/bin:/usr/sbin:/usr/bin:/sbin:/bin",
			"TERM=xterm",
			"MYNAME=txl"
		],
		"cwd": "/",	// 初始目录
		"capabilities": {
			"bounding": [
				"CAP_AUDIT_WRITE",
				"CAP_KILL",
				"CAP_NET_BIND_SERVICE"
			],
			"effective": [
				"CAP_AUDIT_WRITE",
				"CAP_KILL",
				"CAP_NET_BIND_SERVICE"
			],
			"permitted": [
				"CAP_AUDIT_WRITE",
				"CAP_KILL",
				"CAP_NET_BIND_SERVICE"
			],
			"ambient": [
				"CAP_AUDIT_WRITE",
				"CAP_KILL",
				"CAP_NET_BIND_SERVICE"
			]
		},
		"rlimits": [
			{
				"type": "RLIMIT_NOFILE",
				"hard": 1024,
				"soft": 1024
			}
		],
		"noNewPrivileges": true
	},
	"root": {
		"path": "rootfs",
		"readonly": false
	},
	"hostname": "runc-test",
	"mounts": [		// 增加挂载点
		{
			"destination": "/app",
			"type": "bind",
			"source": "/home/txl/cri/app",
			"options": ["rbind", "rw"]
		},
		{
			"destination": "/proc",
			"type": "proc",
			"source": "proc"
		},
		{
			"destination": "/dev",
			"type": "tmpfs",
			"source": "tmpfs",
			"options": [
				"nosuid",
				"strictatime",
				"mode=755",
				"size=65536k"
			]
		},
		{
			"destination": "/dev/pts",
			"type": "devpts",
			"source": "devpts",
			"options": [
				"nosuid",
				"noexec",
				"newinstance",
				"ptmxmode=0666",
				"mode=0620",
				"gid=5"
			]
		},
		{
			"destination": "/dev/shm",
			"type": "tmpfs",
			"source": "shm",
			"options": [
				"nosuid",
				"noexec",
				"nodev",
				"mode=1777",
				"size=65536k"
			]
		},
		{
			"destination": "/dev/mqueue",
			"type": "mqueue",
			"source": "mqueue",
			"options": [
				"nosuid",
				"noexec",
				"nodev"
			]
		},
		{
			"destination": "/sys",
			"type": "sysfs",
			"source": "sysfs",
			"options": [
				"nosuid",
				"noexec",
				"nodev",
				"ro"
			]
		},
		{
			"destination": "/sys/fs/cgroup",
			"type": "cgroup",
			"source": "cgroup",
			"options": [
				"nosuid",
				"noexec",
				"nodev",
				"relatime",
				"ro"
			]
		}
	],
	"linux": {
		"resources": {
            "cpu": {	// cgroup cpu资源限制
				"quota": 10000,
				"period": 100000
			},
			"devices": [
				{
					"allow": false,
					"access": "rwm"
				}
			]
		},
		"namespaces": [
			{
				"type": "pid",
			},
			{
				"type": "network",
			},
			{
				"type": "ipc",
			},
			{
				"type": "uts"
			},
			{
				"type": "mount"
			}
		],
		"maskedPaths": [
			"/proc/acpi",
			"/proc/asound",
			"/proc/kcore",
			"/proc/keys",
			"/proc/latency_stats",
			"/proc/timer_list",
			"/proc/timer_stats",
			"/proc/sched_debug",
			"/sys/firmware",
			"/proc/scsi"
		],
		"readonlyPaths": [
			"/proc/bus",
			"/proc/fs",
			"/proc/irq",
			"/proc/sys",
			"/proc/sysrq-trigger"
		]
	}
}
运行容器
runc run -d test > test.out 2>&1
给容器配置网络
yum install -y bridge-utils
创建网桥
brctl addbr lain0
ip link set lain0 up
ip addr add 10.12.0.1/24 dev lain0
创建 veth 设备
ip link add name veth0-host type veth peer name veth0-ns
ip link set veth0-host up
brctl addif lain0 veth0-host	# 把veth一头绑定到网桥上

brctl show	# 查看绑定
bridge name	bridge id		STP enabled	interfaces
lain0		8000.3e46e96a3af3	no		veth0-host
创建一个网络 namespace
ip netns add mycontainer
ip link set veth0-ns netns mycontainer	# 把veth另一头绑定到namespace
设置 namespace 中的网卡名称并启动
ip netns exec mycontainer ip link set veth0-ns name eth0
ip netns exec mycontainer ip addr add 10.12.0.2/24 dev eth0
ip netns exec mycontainer ip link set eth0 up
ip netns exec mycontainer ip addr add 127.0.0.1 dev lo
ip netns exec mycontainer ip link set lo up
ip netns exec mycontainer ip route add default via 10.12.0.1
修改 config.json 配置,指定网络 namespace
{
    "type": "network",
    "path": "/var/run/netns/mycontainer"
},
本地访问
curl 10.12.0.2
映射端口外网访问
前置配置
iptables -P FORWARD ACCEPT
vi /etc/sysctl.conf
# 设置 net.ipv4.ip_forward = 1
sysctl -p # 立即生效
配置 iptables 规则
iptables -t nat -I PREROUTING -p tcp -m tcp --dport 9090 -j DNAT --to-destination 10.12.0.2:80
删除规则
iptables -t nat -D PREROUTING -p tcp -m tcp --dport 9090 -j DNAT --to-destination 10.12.0.2:80
运行 pause 容器
导出镜像
docker pull mirrorgooglecontainers/pause-amd64:3.1
docker tag mirrorgooglecontainers/pause-amd64:3.1 pause:3.1
mkdir -p pause/rootfs
docker export $(docker create pause:3.1) | tar -C pause/rootfs -xvf -
runc spec
修改 config.json 配置
"terminal": false,
"args": [
    "/pause"
],
运行容器
rc run -d pause > pause.out 2>&1
多容器网络共享
查看刚刚启动的 pause 容器进程 id
runc list
ID          PID         STATUS      BUNDLE                CREATED                          OWNER
pause       22989       running     /home/txl/cri/pause   2023-05-27T07:14:20.061243706Z   root
之前通过 ip netns 创建的ns文件目录在 /var/run/netns,而通过 runc(或普通进程)创建的ns目录在 /proc/pid/ns/net 里。为他们创建软连接
ln -s /proc/22989/ns/net /var/run/netns/proc22989

# 查看ns
ip netns
proc22989 (id: 54)
mycontainer (id: 52)
创建 veth 设备并配置网络
ip link add name veth0-pause type veth peer name veth0-pause-ns
ip link set veth0-pause up
brctl addif lain0 veth0-pause

ip link set veth0-pause-ns netns proc22989

ip netns exec proc22989 ip link set veth0-pause-ns name eth0
ip netns exec proc22989 ip addr add 10.12.0.4/24 dev eth0
ip netns exec proc22989 ip link set eth0 up
ip netns exec proc22989 ip route add default via 10.12.0.1
修改 config.json 容器配置
"namespaces": [
	{
		"type": "pid",
		"path": "/proc/22989/ns/pid"	// 进程命名空间共享
	},
	{
		"type": "network",
		"path": "/proc/22989/ns/net"	// 网络命名空间共享
	},
	{
		"type": "ipc",
		"path": "/proc/22989/ns/ipc"
	},
	{
		"type": "uts"
	},
	{
		"type": "mount"
	}
],
分别启动多个容器
rc run -d web1 > web1.out 2>&1	// 8081端口
rc run -d web2 > web2.out 2>&1	// 8082端口
测试查看网络共享和进程共享
curl 10.12.0.4:8081
curl 10.12.0.4:8082

runc exec -t web1 ps -ef
PID   USER     TIME  COMMAND
    1 root      0:00 /pause
   77 root      0:00 /app/myhttp -p 8081
   88 root      0:00 /app/myhttp -p 8082
  104 root      0:00 ps -ef
使用 umoci 制作镜像文件
runc 需要 OCI Runtime Bundle,我们需要一个将镜像转换为解压包的工具。这个工具将是 umoci ,其唯一目的是操作 OCI 镜像以及与容器镜像交互
umoci init --layout myimage
umoci new --image myimage:v1
umoci unpack --image myimage:v1 bundle	# 将image提取到一个文件夹中
ls bundle	# 查看bundle文件夹
config.json  rootfs  sha256_26ae9613658fba5cce7e44f77431bff7b6b594999df39977c5416154ed8ae68c.mtree  umoci.json
将 alpine 镜像的 rootfs 目录复制到创建的 bundle 目录
cp alpine/rootfs bundle -R
重新 pack
umoci repack --image myimage:v1 bundle
查看镜像状态
umoci ls --layout myimage
v1
umoci stat --image myimage:v1
LAYER                    CREATED                             CREATED BY   SIZE        COMMENT
sha256:d54045c2d86e8e... 2023-05-28T16:10:10.803014564+08:00 umoci repack 2.931MB
使用 runc 运行 OCI 应用程序包
cd bundle
runc run test
代码获取镜像信息
使用 go-containerregistry 库
func main() {
	img := "docker.io/alpine:3.12"
	parseImage(img)
}

// GET /v2/<name>/manifests/<reference>
func parseImage(img string, options ...name.Option) {
	ref, err := name.ParseReference(img, options...)
	if err != nil {
		log.Fatalln(err)
	}

	des, err := remote.Get(ref) // 获取镜像描述信息 ....  http 请求
	if err != nil {
		log.Fatalln(err)
	}

	if des.MediaType.IsImage() { // image模式
		img, _ := des.Image()
		config, _ := img.ConfigFile()

		fmt.Println(config.OS, "/", config.Architecture, ":", config.Config.Entrypoint, config.Config.Cmd)

	} else if des.MediaType.IsIndex() { // index模式
		idx, _ := des.ImageIndex()
		mf, _ := idx.IndexManifest()

		for _, d := range mf.Manifests {
			img, _ := idx.Image(d.Digest)
			conf, _ := img.ConfigFile()

			fmt.Println(conf.OS, "/", conf.Architecture, ":", conf.Config.Entrypoint, conf.Config.Cmd)
		}
	}
}
镜像清单类型参考文档:
Containerd
我们知道很早之前的 Docker Engine 中就有了 containerd,只不过现在是将 containerd 从 Docker Engine 里分离出来,作为一个独立的开源项目,目标是提供一个更加开放、稳定的容器运行基础设施。分离出来的 containerd 将具有更多的功能,涵盖整个容器运行时管理的所有需求,提供更强大的支持。
containerd 是一个工业级标准的容器运行时,它强调简单性、健壮性和可移植性,containerd 可以负责干下面这些事情:
- 管理容器的生命周期(从创建容器到销毁容器)
- 拉取/推送容器镜像
- 存储管理(管理镜像及容器数据的存储)
- 调用 runc 运行容器(与 runc 等容器运行时交互)
- 管理容器网络接口及网络
安装 Containerd
确保先关闭和禁用 Firewalld、SELinux、Swap
使用 yum 安装
su -
yum install -y yum-utils
yum-config-manager  --add-repo https://download.docker.com/linux/centos/docker-ce.repo
yum install containerd -y
使用二进制安装包安装
下载 containerd 并解压到环境变量目录
tar zxvf containerd-1.5.9-linux-amd64.tar.gz
cp -r bin/* /usr/local/bin/
创建 systemd service 启动管理文件 /etc/systemd/system/containerd.service
[Unit]
Description=containerd container runtime
Documentation=https://containerd.io

[Service]
ExecStart=/usr/local/containerd/bin/containerd

Type=notify
Delegate=yes
KillMode=process
Restart=always
RestartSec=5
# Having non-zero Limit*s causes performance problems due to accounting overhead
# in the kernel. We recommend using cgroups to do container-local accounting.
LimitNPROC=infinity
LimitCORE=infinity
LimitNOFILE=infinity
# Comment TasksMax if your systemd version does not supports it.
# Only systemd 226 and above support this version.
TasksMax=infinity
OOMScoreAdjust=-999

[Install]
WantedBy=multi-user.target
生成一个默认配置文件
mkdir /etc/containerd
containerd config default > /etc/containerd/config.toml
修改配置
# 1
[plugins."io.containerd.grpc.v1.cri"]
  sandbox_image = "registry.cn-hangzhou.aliyuncs.com/google_containers/pause:3.6"

# 2
[plugins."io.containerd.grpc.v1.cri".registry]
  [plugins."io.containerd.grpc.v1.cri".registry.mirrors]
    [plugins."io.containerd.grpc.v1.cri".registry.mirrors."docker.io"]
      endpoint = ["docker加速器地址"]

# 3
[plugins."io.containerd.grpc.v1.cri".containerd.runtimes.runc.options]
  SystemdCgroup = true
启动 containerd 并设置开机自启动
systemctl daemon-reload		# 重新加载系统管理服务文件
systemctl start containerd
systemctl enable containerd

# 查看状态
systemctl status containerd
安装 crictl 工具
从 kubernetes-sigs/cri-tools 安装
修改配置
cat > /etc/crictl.yaml <<EOF
runtime-endpoint: unix:///run/containerd/containerd.sock
image-endpoint: unix:///run/containerd/containerd.sock
timeout: 10
EOF
查看镜像列表
crictl images
k8s 部署使用 containerd
加入源
cat <<EOF > /etc/yum.repos.d/kubernetes.repo
[kubernetes]
name=Kubernetes
baseurl=https://mirrors.aliyun.com/kubernetes/yum/repos/kubernetes-el7-x86_64/
enabled=1
gpgcheck=1
repo_gpgcheck=1
gpgkey=https://mirrors.aliyun.com/kubernetes/yum/doc/yum-key.gpg
        https://mirrors.aliyun.com/kubernetes/yum/doc/rpm-package-key.gpg
EOF

yum makecache
安装
yum -y install kubelet-1.26.0 kubeadm-1.26.0 kubectl-1.26.0

# 查看
rpm -aq kubelet kubectl kubeadm
允许数据包转发
echo 1 > /proc/sys/net/ipv4/ip_forward
modprobe br_netfilter
echo 1 > /proc/sys/net/bridge/bridge-nf-call-iptables
设置 kubelet 开机启动
systemctl enable kubelet
修改配置
cat <<EOF | sudo tee /etc/sysctl.d/99-kubernetes-cri.conf
net.bridge.bridge-nf-call-iptables  = 1
net.ipv4.ip_forward                 = 1
net.bridge.bridge-nf-call-ip6tables = 1
EOF

cat > /etc/sysconfig/kubelet << EOF
KUBELET_EXTRA_ARGS=--cgroup-driver=systemd
EOF
初始化集群(指定 –cri-socket)
kubeadm init --image-repository registry.cn-hangzhou.aliyuncs.com/google_containers --kubernetes-version=1.26.0 --pod-network-cidr=10.244.0.0/16 --service-cidr=10.96.0.0/12 --cri-socket=unix:///run/containerd/containerd.sock
安装 flannel
sysctl net.bridge.bridge-nf-call-iptables=1
kubectl apply -f https://github.com/flannel-io/flannel/releases/latest/download/kube-flannel.yml
加入子节点(指定 –cri-socket)
kubeadm join 10.0.1.21:6443 --token itbtmj.x2sju400e1f4eywy \
	--discovery-token-ca-cert-hash sha256:e2769eee28d459a46e428b376a48695f0cc73bd756b3e1dc326eabf55dba185a --cri-socket=unix:///run/containerd/containerd.sock
参考: